AIRFORCE INSTRUCTIONS AND BEST PRACTICES
To use the AIRFORCE Foreskin Restoration Device:
- Flip outer black/blue gripper up completely.
- Place green inner cone against glans.
- Roll your shaft skin over the inner cone. The skin should only be placed over the first 1/2″ of the inner cone. The forward edge should rest in the relief channel. Do not allow the skin to travel beyond the relief channel to prevent pinching.
- While holding the device downwards at a natural angle, flip the outer gripper down over your rolled up skin. Try to get the skin evenly captured by the gripper.
- Once the device is secured, blow air into the inflation tube. Inflate the device and skin to a comfortable level.
- Attach weight if desired, up to 21 ounces (595 gr).
- Secure the oral inflation tube under your waistband. If you desire to add more air it can be easily retrieved.
- Wear device for eight hours per day.
Note: Airforce uses low air pressure to operate. Most guys naturally block the low-pressure air from entering the urethra (urinary opening). However, if you feel air pressure entering your urinary tract, we recommend placing a small barrier piece of medical tape over the urinary opening to seal it while using Airforce. This will prevent air from entering the urethra opening. You can also try small round Bandaids or a piece of Saran plastic wrap.
Do not pump other substances through the Airforce device. It may damage the internal valve requiring replacement.
Restoration Suggestions:
If wearing the device becomes uncomfortable, check to make sure the skin doesn’t extend beyond the relief channel. Re-apply the device making sure the skin does not extend beyond the channel and try using less air pressure.
Moderate tension is good for promoting skin growth. Using excessive tension either by air pressure or weights to the point where the device is very uncomfortable is counter-productive.
Wash device with soap and water. We recommend cleaning with Hibiclens antibacterial/antimicrobial skin cleanser or equivalent. Dirty devices or lack of cleaning may result in a UTI (urinary tract infection.) You can also use bar soap by using a toothbrush brush to apply.
Always seek professional medical advice from your physician or other qualified healthcare provider with any questions you may have regarding foreskin restoration.
Avoiding Discomfort:
Airforce was designed to provide a comfortable restoration experience. If the device becomes uncomfortable after a short period of time (less than 3 hours), consider these points:
- A new gripper may need a few weeks of usage to break in. The rubber will slightly stretch after repeated use and you may find it becomes more comfortable.
- Small folds of skin can get pinched under the gripper leading to discomfort. Try to stretch out the skin prior to flipping the gripper down by rolling the skin over the inner cone, then pulling some rearwards. Only engage the minimum amount of skin under the gripper to get a seal.
- If experiencing discomfort, try inflating the skin to the maximum, then pull up on one gripper tab to release some air. This will help to remove skin wrinkles trapped under the gripper.
- When applying the device and flipping the gripper down, avoid pushing the skin too high up the cone. Doing so will cause the skin to get pinched under the upper portion of the gripper. The skin only needs engagement by the first section of the inner green cone. It is ok to have the leading edge of the skin fall into the relief channel.
- Roll less skin over the green inner cone (just enough so that you maintain an airtight seal.) Airforce will function with as little as .25″ of skin under the gripper.
- Adding a weight, up to 21 0z, may increase comfort. This is because the weight will stretch out any small folds of skin getting pinched under the gripper.
- Underwear: Wear roomy boxer shorts. This allows Airforce to freely hang, avoids bending pressure, and thereby reduces pressure points under the gripper.
DEVICE MAINTAINENCE
As of 5/12/2023, we include a bottle of silicone lubrication, air valve flushing syringe, and a cleaning brush with each Airforce.
If you believe the valve is leaking air back, you can test it by applying the device, inflating it, and place the end of the black tube in a cup of water. If the valve is leaking you will see air bubbles coming from the end of the tube underwater.
If the valve is leaking, it can be caused by loss of lubrication from moist air in your breath. We are now shipping AIRFORCE with a small dropper bottle of silicone lubrication. If your valve is leaking air, lubricating the valve will probably resolve the issue. Unscrew the top of the device, apply two drops of lube into the threaded valve opening, screw the top back on, and blow air through the device. You can insert a piece of paper towel inside the inner cone to absorb excess lube coming through. Try to avoid getting lube on the silicone rubber parts.
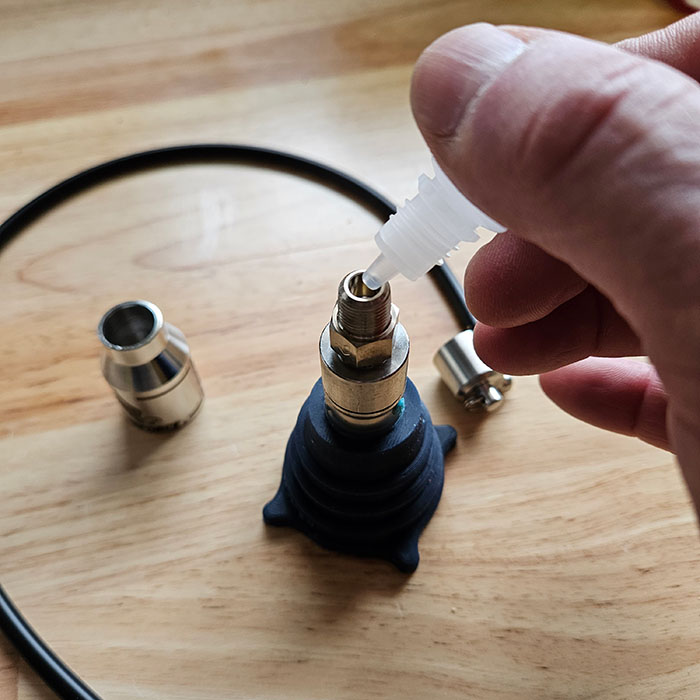
Lubricating air valve
You can also obtain a can of silicone spray with a dispensing straw tube attached to the nozzle. Direct a small amount of spray lube in the center of the valve assembly and follow directions above.
Any lubricant you use must be compatible with Buna rubber seals. We strongly recommend silicone spray. Petroleum based lubricants may cause gumming.
CLEANING THE VALVE
You can clean by flushing it with isopropyl alcohol (IA) using the syringe provided. Over a long period of use dirt or debris may interfere with the valve seating properly causing air leak. It is also good practice to clean and sanitize the valve.
- Remove the inflation tube
- Attach the syringe to the barb,
- Flush the valve with 5ml of IA.
- Reattach the inflation tube and blow out any remaining alcohol.
- Unscrew the cap, allow any remaining alcohol to evaporate.
- Lubricate valve per instructions.
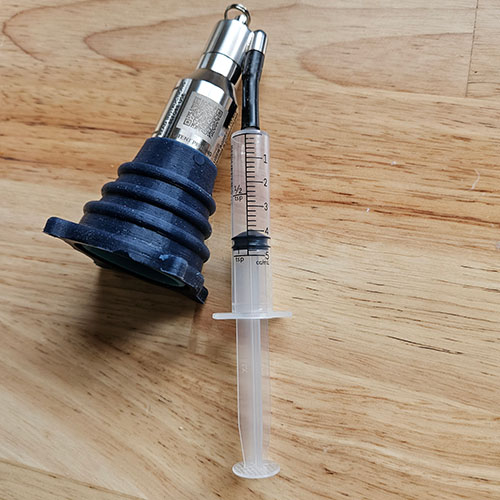
Device flush with isopropyl alcohol
DO NOT ATTEMPT TO REMOVE THE VALVE ASSEMBLY FROM THE CORE. DOING SO MAY DAMGE THE VALVE OR INNER CONE.
To Replace Gripper:
To replace the outer gripper:
- Unscrew the metal air input top.
- Remove the outer metal cover.
- Gently pull the gripper up by its top and guide over the metal components. Soapy water helps.
- Slide the replacement gripper down into place by stretching the rim of the gripper over the inner cone. Do not pull on the gripper tabs. Instead pull on the entire rim. DO NOT TWIST OR PULL ON THE GREEN INNER CONE. EXCESSIVE STRESS ON THE INNER CONE MAY DAMAGE IT.
- Replace the cover.
- Screw top on.
Make sure the gripper is pulled down over the green inner cone, it can slightly overhang.